Writing a New Interpreter
What is Apache Zeppelin Interpreter
Apache Zeppelin Interpreter is a language backend. For example to use scala code in Zeppelin, you need a scala interpreter. Every Interpreters belongs to an InterpreterGroup. Interpreters in the same InterpreterGroup can reference each other. For example, SparkSqlInterpreter can reference SparkInterpreter to get SparkContext from it while they're in the same group.
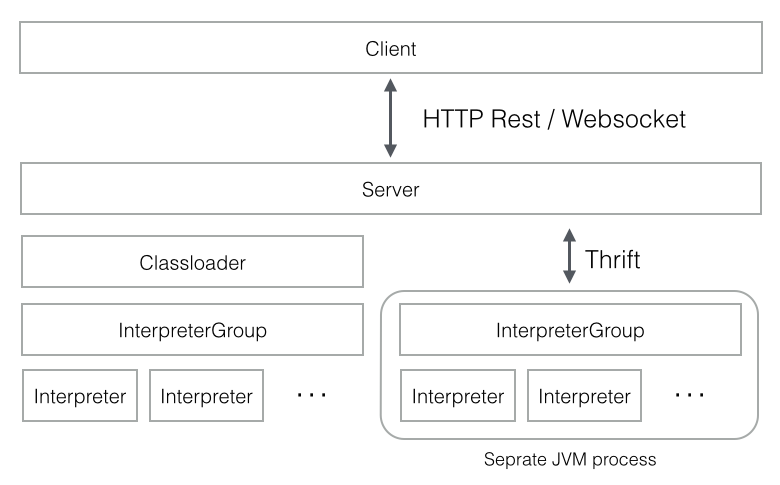
InterpreterSetting is configuration of a given InterpreterGroup and a unit of start/stop interpreter. All Interpreters in the same InterpreterSetting are launched in a single, separate JVM process. The Interpreter communicates with Zeppelin engine via Thrift.
In 'Separate Interpreter(scoped / isolated) for each note' mode which you can see at the Interpreter Setting menu when you create a new interpreter, new interpreter instance will be created per note. But it still runs on the same JVM while they're in the same InterpreterSettings.
Make your own Interpreter
Creating a new interpreter is quite simple. Just extend org.apache.zeppelin.interpreter abstract class and implement some methods.
For your interpreter project, you need to make interpreter-parent as your parent project and use plugin maven-enforcer-plugin, maven-dependency-plugin and maven-resources-plugin. Here's one sample pom.xml
<project xmlns="http://maven.apache.org/POM/4.0.0" xmlns:xsi="http://www.w3.org/2001/XMLSchema-instance" xsi:schemaLocation="http://maven.apache.org/POM/4.0.0 http://maven.apache.org/maven-v4_0_0.xsd">
    <modelVersion>4.0.0</modelVersion>

    <parent>
        <artifactId>interpreter-parent</artifactId>
        <groupId>org.apache.zeppelin</groupId>
        <version>0.9.0-SNAPSHOT</version>
        <relativePath>../interpreter-parent</relativePath>
    </parent>

    ...

    <dependencies>
        <dependency>
            <groupId>org.apache.zeppelin</groupId>
            <artifactId>zeppelin-interpreter</artifactId>
            <version>${project.version}</version>
            <scope>provided</scope>
        </dependency>
    </dependencies>

    <build>
        <plugins>
            <plugin>
                <artifactId>maven-enforcer-plugin</artifactId>
            </plugin>
            <plugin>
                <artifactId>maven-dependency-plugin</artifactId>
            </plugin>
            <plugin>
                <artifactId>maven-resources-plugin</artifactId>
            </plugin>
        </plugins>
    </build>

</project>
You should include org.apache.zeppelin:zeppelin-interpreter:[VERSION] as your interpreter's dependency in pom.xml. Bes
And you should put your jars under your interpreter directory with a specific directory name. Zeppelin server reads interpreter directories recursively and initializes interpreters including your own interpreter.
There are three locations where you can store your interpreter group, name and other information. Zeppelin server tries to find the location below. Next, Zeppelin tries to find interpreter-setting.json in your interpreter jar.
{ZEPPELIN_INTERPRETER_DIR}/{YOUR_OWN_INTERPRETER_DIR}/interpreter-setting.json
Here is an example of interpreter-setting.json on your own interpreter.
[
  {
    "group": "your-group",
    "name": "your-name",
    "className": "your.own.interpreter.class",
    "properties": {
      "properties1": {
        "envName": null,
        "propertyName": "property.1.name",
        "defaultValue": "propertyDefaultValue",
        "description": "Property description",
        "type": "textarea"
      },
      "properties2": {
        "envName": PROPERTIES_2,
        "propertyName": null,
        "defaultValue": "property2DefaultValue",
        "description": "Property 2 description",
        "type": "textarea"
      }, ...
    },
    "editor": {
      "language": "your-syntax-highlight-language",
      "editOnDblClick": false,
      "completionKey": "TAB"
    },
    "config": {
      "runOnSelectionChange": true/false,
      "title": true/false,
      "checkEmpty": true/false
    }
  },
  {
    ...
  }
]
Finally, Zeppelin uses static initialization with the following:
static {
  Interpreter.register("MyInterpreterName", MyClassName.class.getName());
}
Static initialization is deprecated and will be supported until 0.6.0.
The name will appear later in the interpreter name option box during the interpreter configuration process. The name of the interpreter is what you later write to identify a paragraph which should be interpreted using this interpreter.
%MyInterpreterName
some interpreter specific code...
Editor setting for Interpreter
You can add editor object to interpreter-setting.json file to specify paragraph editor settings.
Language
If the interpreter uses a specific programming language (like Scala, Python, SQL), it is generally recommended to add a syntax highlighting supported for that to the note paragraph editor.
To check out the list of languages supported, see the mode-*.js files under zeppelin-web/bower_components/ace-builds/src-noconflict or from github.com/ajaxorg/ace-builds.
If you want to add a new set of syntax highlighting,
- Add the
mode-*.jsfile tozeppelin-web/bower.json(when built,zeppelin-web/src/index.htmlwill be changed automatically). Add
languagefield toeditorobject. Note that if you don't specify language field, your interpreter will use plain text mode for syntax highlighting. Let's say you want to set your language tojava, then add:"editor": { "language": "java" }
Edit on double click
If your interpreter uses mark-up language such as markdown or HTML, set editOnDblClick to true so that text editor opens on pargraph double click and closes on paragraph run. Otherwise set it to false.
"editor": {
  "editOnDblClick": false
}
Completion key (Optional)
By default, Ctrl+dot(.) brings autocompletion list in the editor.
Through completionKey, each interpreter can configure autocompletion key.
Currently TAB is only available option.
"editor": {
  "completionKey": "TAB"
}
Notebook paragraph display title (Optional)
The notebook paragraph does not display the title by default.
You can have the title of the notebook display the title by config.title=true.
"config": {
  "title": true  # default: false
}
Notebook run on selection change (Optional)
The dynamic form in the notebook triggers execution when the selection is modified.
You can make the dynamic form in the notebook not trigger execution after selecting the modification by setting config.runOnSelectionChange=false.
"config": {
  "runOnSelectionChange": false # default: true
}
Check if the paragraph is empty before running (Optional)
The notebook's paragraph default will not run if it is empty.
You can set config.checkEmpty=false, to run even when the paragraph of the notebook is empty.
"config": {
  "checkEmpty": false # default: true
}
Install your interpreter binary
Once you have built your interpreter, you can place it under the interpreter directory with all its dependencies.
[ZEPPELIN_HOME]/interpreter/[INTERPRETER_NAME]/
Configure your interpreter
To configure your interpreter you need to follow these steps:
Start Zeppelin by running
./bin/zeppelin-daemon.sh start.In the interpreter page, click the
+Createbutton and configure your interpreter properties. Now you are done and ready to use your interpreter.
Note : Interpreters released with zeppelin have a default configuration which is used when there is no
conf/zeppelin-site.xml.
Use your interpreter
0.5.0
Inside of a note, %[INTERPRETER_NAME] directive will call your interpreter.
Note that the first interpreter configuration in zeppelin.interpreters will be the default one.
For example,
%myintp

val a = "My interpreter"
println(a)
0.6.0 and later
Inside of a note, %[INTERPRETER_GROUP].[INTERPRETER_NAME] directive will call your interpreter.
You can omit either [INTERPRETER\_GROUP] or [INTERPRETER\_NAME]. If you omit [INTERPRETER\_NAME], then first available interpreter will be selected in the [INTERPRETER\_GROUP].
Likewise, if you skip [INTERPRETER\_GROUP], then [INTERPRETER\_NAME] will be chosen from default interpreter group.
For example, if you have two interpreter myintp1 and myintp2 in group mygrp, you can call myintp1 like
%mygrp.myintp1

codes for myintp1
and you can call myintp2 like
%mygrp.myintp2

codes for myintp2
If you omit your interpreter name, it'll select first available interpreter in the group ( myintp1 ).
%mygrp

codes for myintp1
You can only omit your interpreter group when your interpreter group is selected as a default group.
%myintp2

codes for myintp2
Examples
Checkout some interpreters released with Zeppelin by default.
Contributing a new Interpreter to Zeppelin releases
We welcome contribution to a new interpreter. Please follow these few steps:
- First, check out the general contribution guide here.
- Follow the steps in Make your own Interpreter section and Editor setting for Interpreter above.
- Add your interpreter as in the Configure your interpreter section above; also add it to the example template zeppelin-site.xml.template.
- Add tests! They are run for all changes and it is important that they are self-contained.
- Include your interpreter as a module in
pom.xml. - Add documentation on how to use your interpreter under
docs/interpreter/. Follow the Markdown style as this example. Make sure you list config settings and provide working examples on using your interpreter in code boxes in Markdown. Link to images as appropriate (images should go todocs/assets/themes/zeppelin/img/docs-img/). And add a link to your documentation in the navigation menu (docs/_includes/themes/zeppelin/_navigation.html). - Most importantly, ensure licenses of the transitive closure of all dependencies are list in license file.
- Commit your changes and open a Pull Request on the project Mirror on GitHub; check to make sure Travis CI build is passing.